

Although kitchen sink drains will rarely fail to the extent of requiring complete replacements, kitchen sink replacements are still investable. Firstly, most kitchen renovation projects often come with an overhaul of the entire sink system.
Thus, besides knowing how to install a kitchen sink drain, you might have to know how to install a kitchen faucet, a kitchen sink, and a kitchen faucet aerator. These are simple DIY projects that you can quickly accomplish without involving a plumber or technician. Notably, replacing a kitchen drain may also result from corrosion of drain components, irreparable leaks, or a difficult clog.
This article focuses on how to install a sink drain. But before we take you through the step-by-step installation process, we find it necessary to bring you up to speed with some basics.
Tips for Kitchen Sink Drain Installation
Kitchen sink drain installations vary depending on the existing differences between your old system and the new system. For example, kitchen sink drains have varying depths, which may call for minor alterations on the drain pipe that enters the wall. Besides, while other sink drains require the installation of a garbage disposer, some do not.
And just like kitchen faucets that come in different types, sink drains are also available in various kinds. Choose the type of sink drain depending on the configurations that best match your sink orientation. There are sink drains for double-basin sinks, single-basin sinks, and models that also include garbage disposals.
Also, it is essential to note that sink drain pipes are made from different types of materials. The two popular models are either made from PVC plastics or chromed copper. Since kitchen drains are often hidden from view, many people often opt for plastic models which are less aesthetic but are as durable as chromed copper models.
Unlike bathroom sink drains with diameters of 1¼ inches, kitchen sink drains are comparatively larger and have diameters of 1½ inches. There are also occasions when you may find 2-inch drain pipes. In such a scenario, consider purchasing an adaptor that will help you connect the 2-inch outlet pipe to the 1½-inch drain kit.
Tools, Materials, and Equipment That You Need for Installing a Kitchen Sink Drain Pipe
- Channel-type pliers
- A marker
- Hacksaw or PVC tubing cutter
- Basket wrench
- A rag
- Tape measure
- Sink drain and strainer kit
- Kitchen drain trap kit
- Plumber’s putty
A Step-By-Step Guide on How to Install a Kitchen Sink Drain
The following steps can help you fix a kitchen sink drain;
Step 1: Choose an Assembly Kit That Is Compatible with Your Sink
It is impossible to fit a sink drain system without choosing an assembly kit that is compatible with your sink type. Drainpipe assembly kits are available online. However, you can still find pretty viable options in your hardware store or at a departmental store. But even before you get to that, you need to know what makes up a complete drain kit.
The essential components of a drain kit include a basket strainer, a rubber washer, a locking nut, a brass tailpiece, and a friction ring. Ensure that you have all the mentioned components and confirm if the kit is compatible with the drain hole under your sink. And to ensure compatibility, the following steps will come in handy;
- Take the diameter measurements of the drain hole at the bottom of the sink and compare it with the diameter of your new drain pipe.
- Use the old basket strainer to choose a new one that will fit your sink.
- Choose a brass-made tailpiece for durability purposes and ensure that the tailpiece you choose perfectly fits your drainpipe.
Step 2: Check the Height of Your Drain Outlet
The drain outlet height is the other aspect that you should not ignore. So, measure the trap arm of your old sink. And if you do not know what the trap arm is, note that it is the horizontal part of the system between the branch drain pipe that enters the wall and the P-trap or U-shaped trap bend.
Measure the drain outlet height from the base of your cabinet or from the floor to the center of your trap arm. Any drain outlet heights of more than 16 inches may not allow some sink drains to have sufficient downward slope for the trap arm. You can lower the drain outlet in such cases.
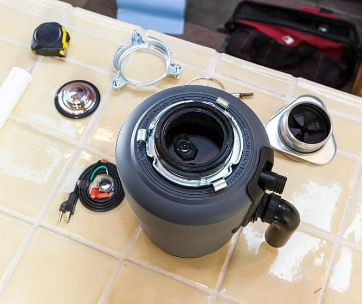
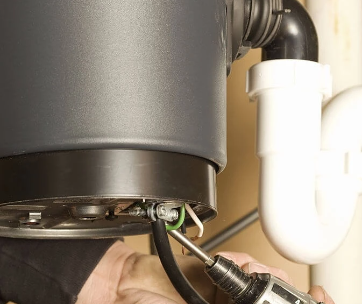
Step 3: Install Your Sink’s Garbage Disposal
Of course, this is not standard practice for all sink drain installations. However, for sinks systems that require garbage disposal kits, you may need to do this before continuing your installation process. Installing a kitchen sink garbage disposal is equally a step-by-step process that we will discuss in detail.
Step 4: Disconnect the Drainpipe and Takeoff the Old Strainer
You may not need to go through this step if you are doing a new installation. However, if you are doing a sink drain replacement, use channel-type pliers to loosen the fittings on the drainpipe to remove it from the drain. You will also need to unscrew the nut that holds the basket strainer from down using a basket wrench and pull out the old basket strainer through the drain hole underneath the sink.
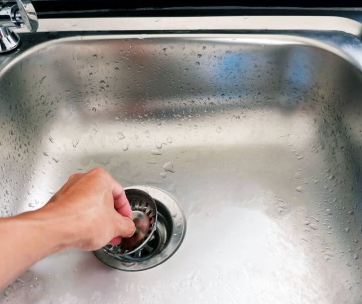
Step 5: Insert the Basket Strainer
The bulk of your installation work lies here, and ensure that you carry out this process diligently to avoid damaging the pipes. You can insert a basket strainer on a new or old system by following these simple steps;
- Using a plumber’s putty, knead and form a strand with the putty. Your rope should be about 5 inches long and ensure it has an even diameter.
- Flip your basket upside down and apply the putty strand on the lip of the new basket strainer. You can conveniently do this using your fingers of one hand while holding the strainer on the other hand. Do not spread the putty too thin.
- Place the basket strainer in the drain hole of your sink and press it gently until it evenly flushes with the edge of the drain hole. The plumber’s putty will conveniently spread and seal off the space between the strainer and the sink’s drain hole.
- Bend under your sink to wipe off all the excess putty using a rag. You can do this more conveniently by opening your cabinet doors if your sink is placed over the cabinet. The reason why you should clean any excess putty is to avoid affecting the seal.
Step 6: Fix the Friction Ring and Rubber Washer onto the Basket Strainer
These two components go under the basket strainer. So, you can squat and slide the new rubber washer on the strainer and follow it up with the friction ring. The rubber washer creates an extra seal while the friction ring protects the washer from potential damage from the nut.
Step 7: Secure the Strainer
It is time to secure the basket strainer using the nut, which resembles a large metal ring. Align the nut's threads with the threads at the bottom of the strainer and the nut in a clockwise direction to tighten it. Screw on the nut until it is very tight. You can first do this using your hands and then use your pliers and the wrench to complete this action.
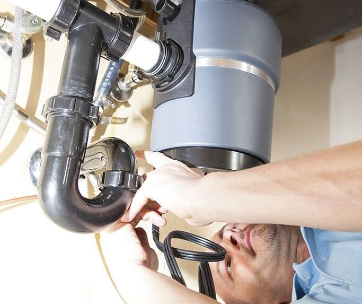
Step 8: Connect the Drainpipes
Finally, it is time to connect the drainpipes, and connecting the drainpipes involves the following steps;
- Hold the brass tailpiece and attach it to the strainer from the underside, ensuring that its threads align correctly with those of the basket strainer. Carefully screw the tailpiece as tight as you can, using your hands.
- Take the rubber gasket and put it in the drainpipe, ensuring that it fits snugly. The rubber gasket comes in handy in creating a watertight seal between the tailpiece and the drainpipe.
- Push the drainpipe into the tailpiece, and align the edges of these two components.
- Push the connector ring up and tighten it on the brass tailpiece. The connector ring, a small plastic ring, comes with the drainpipe and anchors it to the tailpiece. Use a wrench to ensure that it is as tight as possible.
Step 9: Test the System
You can test your new sink drain once you are satisfied with your work. Testing it allows you to see how water flows from your sink, through the strainer, and into the drainpipe. Please check under the sink for any leakage, and should there be any, recheck your system for any loose connections.
Turn off your kitchen faucet and tighten the plastic connector and the tailpiece again. Test again, and if there is still any evidence for any leaks, it could be the alignment of your connections, or you did not apply the plumber's putty appropriately.
Key Takeaway
Ideally, installing a kitchen sink drain is a simple DIY project that you can handle without unnecessary plumbing costs. However, it is essential to take utmost care so that you do not get into accidents. Also, some people end up with damaged pipes because they overtighten the components.
If your sink has a double basin, you will undoubtedly require a tee connector to join the two tailpieces and direct the flow to the drain trap. However, this is not necessary for single basin sinks.

Comments